Building a Fire Box for Camp Cooking
|
|
|
FIRE BOX Chuck Wagon Cowboy Camp Cooking |
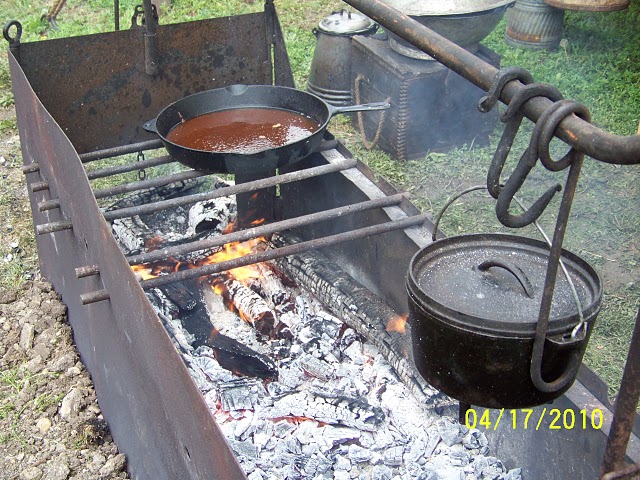
There are many ways to build your own cowboy camp firebox. Above, the
photo shows one of the Chuck Wagon fire boxes with spit during the Troy, Texas
Chuck wagon cook off. While, most chuck wagons dug a narrow trench in the
ground, stabbed the spit hangers into the soil and hung the spit bar across,
they cooked right over the dug out hole. Although, some might have used small
cast iron camp stoves or other resources though ground cooking was the normal
method.
FIRE BOX USAGE:
The fire box provides a four sided structure to hold wood inside with out the
need to dig a hole or trench in the ground. It also allows the spit to be hung
over the box to hang cookware for heating and grill bars along the top to place
skillets, pot or griddles to cook from. Modern day, the fire box allows to set
up on any surface, be it the great outdoors or in a parking lot.
PURPOSE:
Provided a general guide to build a fire box. It can be modified too your
likings and needs. However, the important factor is to build one that will hold
up the heavy use, weather conditions and heat from the various woods or
coal.

Box Dimensions:
Length: 48" inches
Width: 18" inches
Height: 14" inches
Spit Dimensions:
Length: 54" inches
Height: 42" inches measured from
ground:
Materials:
4'x4' Sheet Steel Plate 1/8" inch thick. I recommend nothing smaller
because it needs to be tough enough and strong enough to handle the weights of
cast iron skillets, dutch ovens and boiling water. Although should you increase
the width, the plate becomes very heavy to handle. At 1/4 inch steel, it begins
to weight well over 100 pounds and becomes difficult setting up and storing
upon tearing down.
23 Feet 5/8" inch Round Steel Rod
33 Feet 3/8" inch Round Steel Rod
4 Feet 3/4" inside diameter Steel Pipe Tubing
2 Pieces 1" inch angle iron 36" inch length (only if you
desire a bottom)
1 Can High Temperature Flat Black Paint
(Note:) The best place to find materials often is at a scrap yard.
Some fabricators can also be a good source for materials as they often have
scarps left over from other projects. Be innovative.
TOOLS:
Pair of leather work Gloves
Heat Torch
Metal Saw
Welder and Safety Equipment
Metal Bucket half filled with water
Table Vise
Large Pliers or vise grips
Directions:
1. BOX: Cut Flat 1/8"sheet steel into two matching sections
48" x 14" These will become the side panels of the fire box.
Then cut two matching end pieces 18" x 14".
Note: If you desire to have a bottom on
the fire box, then cut a final section at 48" x 18" that will be
placed as a flooring or bottom. This will require a larger sheet of steel
2' x 4' ft to make the bottom. Weld 1 section of angle iron on each side of the
fire box. I recommend the piece to be welded centered and between two to four
inches from the bottom. This will allow the wood to burn without destroying
grass such as if cooking where digging a pit is prohibited, performing catering
or just desire to not have an open fire box. However, a good fire pit should
allow average size logs to be place inside to burn. If floor is any higher than
four inches, you will need to increase the height of the box from 14"
inches to 16" or 18" inches to allow sufficient room for wood to burn
while allowing the later grill to lay flat.
2. HING JOINTS: Cut 12 each (3" sections of the 3/4"
Pipe) These become the attachment joints on the end of the box.
3. Place 1 section of the cut 3/4" Pipe on each end of the flat sheet
steel welding flush with the top. Pipe should be welded center to the sheet
metal that will build a hinge joiner. After completing the welding of one at
each end, repeat this process for the opposite side panel.
4. Place 1 section of cut 3/4" Pipe on each end of sheet metal welding 3
1/2 inches below the top pipe welded. Note:
You should be able to fit one piece of pipe between the welded section with a
1/4" gap above and below the welded fittings. Repeat the step on both
sides and then again for the opposite side panel.
5. Cut 4 pieces of 5/8" inch rod into 13" lengths. Wearing
welding safety gear, long pants, a long sleeved shirt and leather gloves you
are ready to handle this step. Using a torch and a table vise you will bend a
circular eye in one end. To do this place the rod to be bent in a table vise so
that the area to be heated and bent is just above the jaws of the vise. Heat
the area of the rod to be bent with the torch until it is glowing bright
red-orange. Grab hold of the end of the rod using heavy pliers or vise grips (do not grab around the heated area, grab above it)
and pull it over the jaw of the vise to bend it. Use a hammer to hit the rod
just above the heated area to assist if needed. Adjust the rod in the vise and
continue heating, until you can make a circular bend with a (1" inch
circumference). When completed, it should look like a long eye bolt. Remove
the rod from the vise and drop in into a metal buckle half full of water to
rapidly cool. Repeat this process, to make four total Eye bolt rods ensuring
they are uniform. Upon completion, each eye will be 1" inch
circumference with at least 10" inch shank.
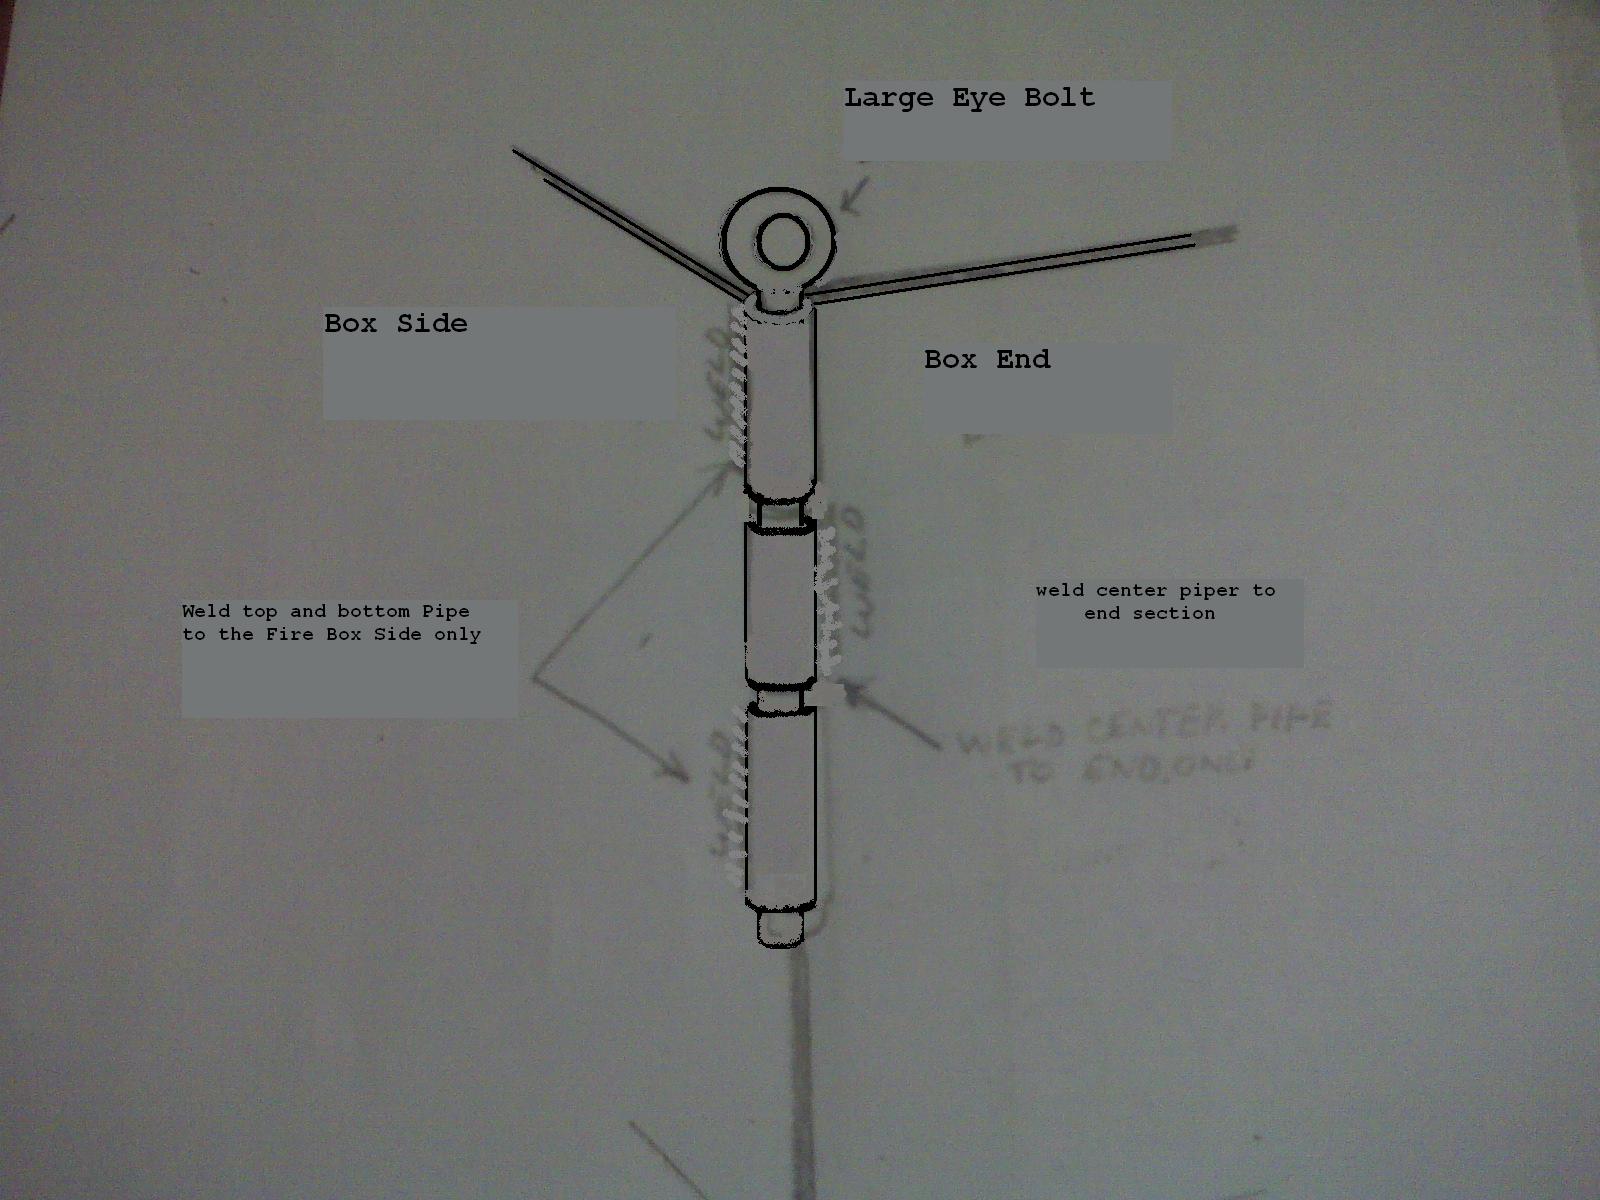
6. Place 1 section of cut 3/4" Pipe on the end panel at 3 1/4" inch
from the top. When placed, the end panel next to the side panel should line up
like a door hinge. Note: Ensure that when
sitting upright, each corn joins with a 90 degree angel and the welded pipe on
the end panel will slide easily between the side panel. After completing one
corning. Repeat the process and check the fitting with the opposite side panel.
Once correct and securely welded, complete the opposite end. Below is how the
fire box corner should look. Complete all four corners creating the rectangular
shape Fire Box. Each corn squared at 90 degree angles.As each corner is
completed, drop one of the 5/8" inch steel Eye Bolts into pipe to hold the
corners together.
|
|
|
Fire Box Corner held with Eye Bolt |
6. SPIT MOUNT: Cut remaining section of pipe in half, giving you (2) six
inch pieces. This will be used to support the spit arms. Measuring the end
section of box centering the one section of 6" inch pipe in the middle.
Weld vertical to the box end flush with the upper edge. Weld should also partially
close the bottom so that the spit arms will sit secure inside pipe without
falling through. Repeat step 6 on the opposite end. Now that the basic
box is completed, we now give it the workable finishes that will make this tool
admired by neighbors, ranchers and other outdoor cooking enthusiast.
7. BOX RAIL: First Cut (2) 5/8" inch rod sections into 52"
inch lengths. Place one rod into table vise making a 2" inch bend on one
end that is a 90 degree angle. Remove from vise and place in water bucket to cool
and repeat the process bending the second piece. Once both pieces have been
bent and cooled, slide through eye bolt from end to end along the side section.
8. SPIT ARMS: Next you will make the spit arm rods that the spit hangs
on for placing hooks to hold the coffee pots, dutch ovens and such. Decide
whether you desire a lazy (S) arm or and eye that would hold the spit. My
personal spit has the Eye's but many use the lazy S so we will use it
here. Cut (2) 5/8" inch rod sections 40" inches in length. Take
one section and place 2" inches into table vise and heat until you can
bend it over. Remove and adjust so that you can continue heating with torch and
bend into a U-shape with about a 1 1/2" inch opening. Then cool rapidly
with water. Place the U-shape back into vise and heat the upper section about
two inches above the U and turn it back as if making the U become an S-shape.
Continue heating until the bend looks as a long gated S. Length should be
between 33" to 35" now in length. Repeat this process and copy
the second one to be identical to the first. When competed, cool and slide one
arm in on each side of the box.
9. SPIT: Cut one section of 5/8" inch rod 54" inches in
length. Place one end in vice and heat to make an eye as in step 5. On the other
end, you can leave it straight or put a bend like a U - shape in it or another
eye. Once complete, cool with water and place over the spit arm supports. Check
for leveling. You can adjust height by grinding the bottom of the spit arms
removing what ever amount needed to make level when placing the arm back into
the fire box mounting bracket.
10. GRILL: Cut (20) pieces of 3/8" inch rod into 22"
inch lengths. Take one piece and place into table vise and heat bending into an
eye as you did in step 5. After completing all 20 pieces, remove one Box rail
side and slide the eye through the rail laying over the box resting on the
opposite box rail. Some pieces may be longer and should be cut to give a
uniform appearance.
11. HOOKS: With any remaining scrap rod, make several hooks
of different lengths. These come in handy with different size settings for
cooking with the many cast iron pots, dutch ovens and such that you may desire
to place above the fire on the spit.

11. PAINT:
With anything made of steel it will rust. Since this is a fire box, I recommend
using a high temperature paint. Paint everything in a flat black color.
12. Modifications: You can modify this plan to your desires.
One may prefer to have a box which is with a deeper fire wall, others may
desire a longer box or perhaps a shorter, smaller box. You can even cut the
sides and create doors to add wood. However, I only cover one side with a grill
cover. While you could cook on them, I place either my skillet or griddle on
the fire box and cook on my cookware. This is not a BBQ pit and is design for
performing the best cowboy cooking you'll need using your cast iron cookware
outdoors. Happy trails my friends.
|
|
|||
|
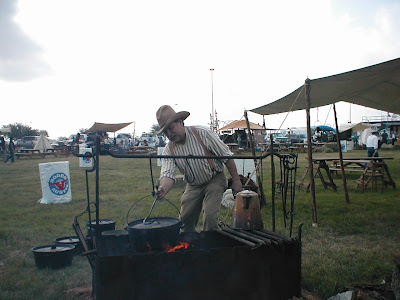
Chuck Wagon Fire Box |
|
|
||
|
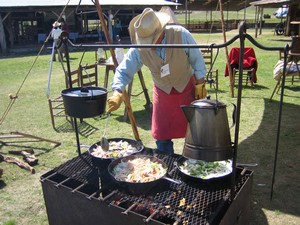
Another Design Cowboy Fire Box |
|
|
|
Another Chuckwagon Fire Box |

Please review these pictures and our plan. You can clearly see three completely different fireboxes, but each with some similarities along with a few differences. Some are made so heavy duty, they weigh a couple of hundred pounds. Some choose using heavier rods, which the top is using one inch rod for the spit and spit arms. If you have any questions, feel free to contact us at rogeredison@yahoo.com Thank for viewing. I'm Roger Edison with Cowboy and Chuckwagon Cooking.
Posted by cowboysandchuckwagoncooking at January 05, 2011